Possibly one of Excels most underutilized aspects is its ability to create dynamic named ranges that will expand and contract according to the data in them. Below are 7 different types of these ranges.
For ALL examples you need to:
- Fill Column A With A Mix Of Text And Numeric Entries.
- Go To: Insert>Name>Define and choose any name you like (in this case MyRange)
In the Refers To box:
- Expand Down As Many Rows As There Are Numeric Entries.
In The Refers To Box Type: =OFFSET($A$1,0,0,COUNT($A:$A),1) - Expand Down As Many Rows As There Are Numeric And Text Entries.
In The Refers To Box Type: =OFFSET($A$1,0,0,COUNTA($A:$A),1) - Expand Down To The Last Numeric Entry **
In The Refers To Box Type: =OFFSET($A$1,0,0,MATCH(1E+306,$A:$A,1),1)
If You Expect A Number Larger Than 1E+306 (A One With 306 Zeros) Then Change This To A Larger Number. - Expand Down To The Last Text Entry **
In The Refers To Box Type: =OFFSET($A$1,0,0,MATCH(“*”,$A:$A,-1),1) - Expand Down Based On Another Cell Value **
Put The Number 10 In Cell B1 First Then:
In The Refers To Box Type: =OFFSET($A$1,0,0,$B$1,1)
Now Change The Number In Cell B1 And The Range Will Change Accordingly. - Expand Down One Row Each Month **
In The Refers To Box Type: =OFFSET($A$1,0,0,MONTH(TODAY()),1) - Expand Down One Row Each Week **
In The Refers To Box Type: =OFFSET($A$1,0,0,WEEKNUM(TODAY()),1)
Requires The “Analysis Toolpak” To Be Installed. Tools>Add-Ins-Analysis Toolpak
** include blank cells.
You can also change the Columns the dynamic range will span by simply changing the last Argument of the OFFSET function to a higher number than 1.
You could even expand across your Columns dynamically by placing another COUNT or COUNTA formula as the last argument, instead of 1. See below:
=OFFSET($A$1,0,0,COUNTA($A:$A),COUNTA($1:$1))
This dynamic range will now also expand across Columns in Row 1. So if you add another Column to your Table the dynamic range will automatically incorporate it.
To try and give you a better understanding of the OFFSET formula, read the text below taken from the Excel help file.
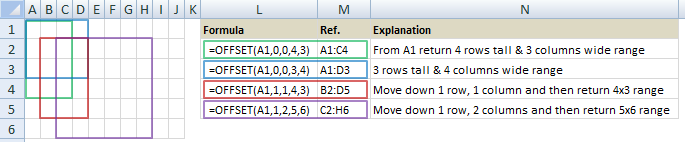
OFFSET(reference,rows, cols,height,width)
Reference : is the reference from which you want to base the offset. Reference must be a reference to a cell or range of adjacent cells; otherwise, OFFSET returns the #VALUE! error value.
Rows : is the number of rows, up or down, that you want the upper-left cell to refer to. Using 5 as the rows argument specifies that the upper-left cell in the reference is five rows below reference. Rows can be positive (which means below the Starting reference) or negative (which means above the Starting reference).
Cols : is the number of columns, to the left or right, that you want the upper-left cell of the result to refer to. Using 5 as the cols argument specifies that the upper-left cell in the reference is five columns to the right of reference. Cols can be positive (which means to the right of the Starting reference) or negative (which means to the left of the Starting reference).
If rows and cols offset reference over the edge of the worksheet, OFFSET returns the #REF! error value.
Height : is the height, in number of rows, that you want the returned reference to be. Height must be a positive number.
Width : is the width, in number of columns, that you want the returned reference to be. Width must be a positive number.
If height or width is omitted, it is assumed to be the same height or width as reference.